Ubuntu C Example Tutorial
Use the Ubuntu C example to read ANROT sensor data in makefile-based or embedded Linux workflows.
- ubuntu
- c
- tutorial
Ubuntu C Serial Reading Example
Protocol Support
| Protocol / frame | Support | How this example handles it |
|---|---|---|
0x91 IMUSOL | Supported | Decodes a single-device float frame and prints receive_imusol. |
0x62 GWSOL | Supported | Decodes gateway float collection frames and prints each node. |
0x63 GWSOL Compact | Supported | Decodes the compact header and 0x93 node blocks, converts them to float values, and prints the gateway timestamp. |
0x90, 0xA0, 0xB0, 0xB1, 0xC0, 0xD0, 0xD1 | Supported | Parses loose single-field output modes. |
0xF0 Pressure | Skipped | The code advances past the pressure item and does not output pressure. |
Download and unzip: demo-ubuntu-en.zip
This example reads ANROT UART packets from a USB-UART device on Ubuntu and prints decoded sensor values from the C parser.
-
Test environment: Ubuntu 16.04
-
Test equipment: Hi226, Hi229
1. Find the USB-UART device
Ubuntu usually includes CP210x / CH340 USB-UART drivers. After the adapter is connected, the system should create a device file under /dev.
Check if the system recognizes the USB-UART device:
-
Press Ctrl + Alt + T to open a terminal.
-
List the serial devices under
/dev:ls /dev/ttyUSB*In the file list, look for
ttyUSB*. The number is assigned by the operating system and may change when multiple USB serial devices are connected.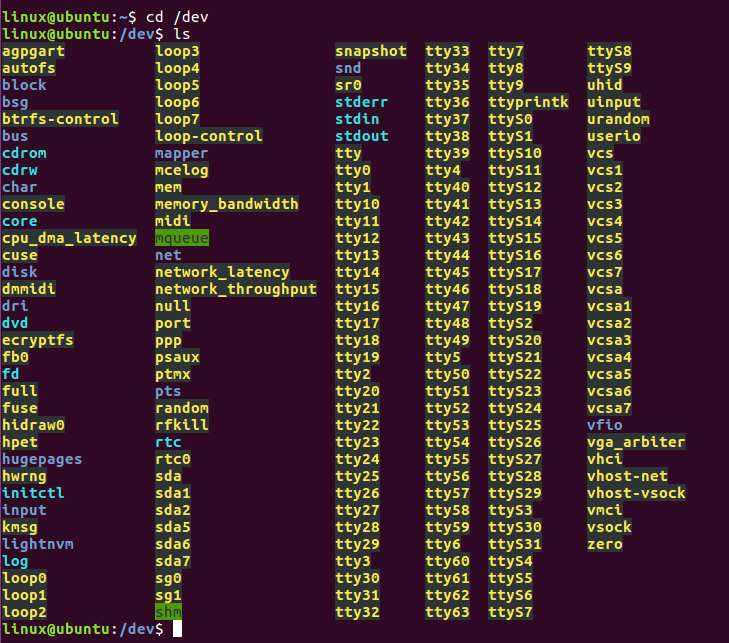
The screenshot above shows the
/devdirectory before the USB serial device is connected. Insert the USB cable, connect the module, and runlsagain:The new
ttyUSB*entry is the serial device:
The ttyUSB0 path is used as an example. Record the actual device path assigned by your system, such as ttyUSB1 or ttyUSB2.
2. Set the baud rate
The example supports 115200, 460800, and 921600 baud. It uses 115200 by default.
If the output frame rate is higher than 100 Hz, edit options.c_cflag in main.c and use a higher baud rate.
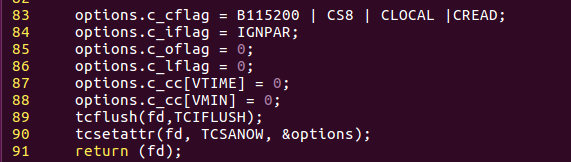
In the screenshot, line 83 can be changed from B115200 to B460800 or B921600.
3. Compile and run
Build the example and run it with the serial device name assigned by the system:
cd demo-ubuntu-en/demo_ubuntu
make
sudo ./main ttyUSB0
After successful execution, this screen will appear:
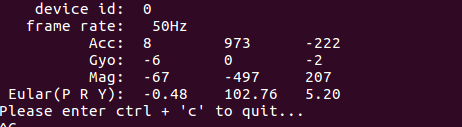
The values on this screen change as the module moves.
-
If the source files are modified later, clean the old build output and rebuild the executable.
make clean make -
To add source files, update Makefile with the new object file name. For example, if
append_file.cis added, addappend_file.oto the object list. If the new file depends on a third-party library, add the library flag in the form-l<lib_name>. -
If this message appears:

The serial port was not found. Return to Find the USB-UART device and confirm the device name.